I'm sure you know by now that there has been alot of Siri servers/proxys have been going around that allow non-iPhone 4S users to authorize and use Siri. It is not stated however, how they go about doing this. Thus, in this step-by-step guide from iJailbreak.com you will learn how to setup your own authorization server based off plamonis Siriproxy and Applidiums Cracking-Siri for you to use with you and your friends.
This means you can make your own Siri proxy server to add custom Siri commands to your iPhone 4S. This also means that you can create your own Siri proxy server to make a Spire proxy host to use Siri on older iOS devices.
Requirements:
Note: For Cyberduck, setup an SFTP connection (SSH file transfer protocol) pointing to your server, not FTP.
How To Setup Siri Proxy Server
Step 1) - For this to work, you're going to need Linux (use VirtualBox if you run Windows or Mac) and download Ubuntu, which is a form of Linux.
Step 2) - Once you have access to the Linux OS you will need to install git. In order to do this you will need to SSH into Linux, or open Terminal (in this tutorial, I am SSH-ing into my Ubuntu 11.10 Server). With Terminal open type:
sudo apt-get install git
Note: It might ask you if you're sure to continue, just hit Y
Step 3) - Once you've done that, you're going to need to clone my git repository. To do this, type the following into Terminal:
mkdir SiriStuff
cd SiriStuff
sudo git clone git://github.com/StanTheRipper/SiriAuth.git
sudo git clone git://github.com/StanTheRipper/AuthGrabber.git
Step 4) - Now we will need to get SiriAuth working, you're going to need to install all the dependencies that SiriProxy needs.
Note: Don't worry, I have made a script for it to seriously simplify this process ![]()
To do this, type:
sudo chmod -R 777 SiriAuth
cd SiriAuth
sudo ./dependencies.sh
sudo ./certs.sh
cd ../
After typing the commands above, everything will install that is needed (RVM, ruby, openssl, etc) and generate the certificates needed. If you're getting script errors, just enter each line as follows:
sudo apt-get update
sudo apt-get install nano ruby build-essential openssl libreadline6 libreadline6-dev curl git-core zlib1g zlib1g-dev libssl-dev libyaml-dev libsqlite3-0 libsqlite3-dev sqlite3 libxml2-dev libxslt-dev autoconf libc6-dev ncurses-dev automake libtool bison subversionbash < <(curl -s https://raw.github.com/wayneeseguin/rvm/master/binscripts/rvm-installer)
[[ -s "$HOME/.rvm/scripts/rvm" ]] && . "$HOME/.rvm/scripts/rvm"
echo '[[ -s "$HOME/.rvm/scripts/rvm" ]] && . "$HOME/.rvm/scripts/rvm" # Load RVM function' >> ~/.bash_profile
rvmsudo rvm install 1.9.3
rvm use 1.9.3 –default
rvmsudo gem install eventmachine CFPropertyList httparty json uuidtools
cd SiriAuth
sudo ./certs.sh
Step 5) - To get AuthGrabber working, you need dnsmasq installed. The install script provided installs and configures dnsmasq for you. Then to install everything needed for AuthGrabber, type:
sudo chmod -R 777 AuthGrabber
cd AuthGrabber
sudo ./dependencies.sh
sudo ./certs.sh
cd ../
If you're getting script errors, just enter each line as follows:
sudo apt-get update
sudo apt-get install dnsmasq nano ruby build-essential openssl libreadline6 libreadline6-dev curl git-core zlib1g zlib1g-dev libssl-dev libyaml-dev libsqlite3-0 libsqlite3-dev sqlite3 libxml2-dev libxslt-dev autoconf libc6-dev ncurses-dev automake libtool bison subversion
sudo cp files/dnsmasq.conf /etc/dnsmasq.conf
#don't do this bit if you've done it in the previous step
bash < <(curl -s https://raw.github.com/wayneeseguin/rvm/master/binscripts/rvm-installer)[[ -s "$HOME/.rvm/scripts/rvm" ]] && . "$HOME/.rvm/scripts/rvm"
echo '[[ -s "$HOME/.rvm/scripts/rvm" ]] && . "$HOME/.rvm/scripts/rvm" # Load RVM function' >> ~/.bash_profile
rvmsudo rvm install 1.9.3
rvm use 1.9.3 –default
rvmsudo gem install eventmachine CFPropertyList httparty json uuidtools
#but do this bit
sudo AuthGrabber/certs.sh
Step 6) - Now you have everything setup, you're going to need authorization keys from an iPhone 4S. AuthGrabber does this for you. SSH into your server and navigate to the AuthGrabber folder (SiriStuff/AuthGrabber) and copy the file 'ca.crt' to the host computer (or if Linux is your main OS, copy it to your desktop). Then email yourself that file, open it up on the device from the sent email, and click install
Finally, you need to change the DNS on the iPhone 4S to the IP of your server. You can find out the internal IP of your server by typing ifconfig into terminal.
Then once the certificate is installed and the DNS has been changed on the iPhone 4S, you need to run the caching script. To do this, type:
rvmsudo AuthGrabber/cache.sh
Then open Siri and ask it something.
The script will now say in the terminal window (if you've done it right) 'Request cached, writing to auths/acehosts0.txt' then navigate to /auths in the AuthGrabber directory and open up the file 'acehosts0.txt' in a text editor, you should have lots of different lines of code that look like this (these values are invalid by the way):
SSL proxy layer established !
ACE /ace HTTP/1.0
Host: guzzoni.apple.com
User-Agent: Assistant(iPhone/iPhone4,1; iPhone OS/5.0.1/9A405) Ace/1.0
Content-Length: 2000000000
X-Ace-Host: 211ea22f-2740-4582-9f4d-4f7d9bd7cf28
#####################################################
{"group"=>"com.apple.ace.system",
"aceId"=>"6698E3AA-132F-494C-9DDB-C3C9CA14241C",
"class"=>"LoadAssistant",
"properties"=>
{"assistantId"=>"04a9de4e-e92a-41b6-ab34-ab124186c258″,
"sessionValidationData"=>
"\002E!\216\371$\305X^\246\251\210\31752]\213\337\262\036\257\342\365\230\237kY\024\321\031\030X0\000\000\000\340\003\000\000\000I\000\000\000\200\233\323N8\242\bv\335\310\230R8\246\327\206\234\230\205)\213\e\270Z\300\206(\337?\242\2247\211?\345l8ZSF-\322\030\n\211uF\0322\254\275\363\363\202\233X\360\277\254\242\031\345\372\3169\200\263j\b\037*2{\n/\a\264\034\"\332\022\200\301\243w\021az\276\213c\b\252!\200\212\341\220tK\321y\240\a\270\276h\375\336\233\360In\003\337\315i\213\372sG,w\206\324y\325\241a\000\000\000\000\000\000\000O\001\0030\370\241\004\207z\214\355\2155M\312\374\273\200\035\a'T\000\000\0006\004\001\2012\325\260\327\226T\261K\266F\360\365\302\326\376N\347\222\255i\020\226\2106\207\267\274×5\315N\216\016\232\331\273[OVwZ\212)\3272+\220\343id\360",
"speechId"=>"cc4301ac-db83-48bb-8380-378393b033b4"}}
#####################################################
{"group"=>"com.apple.ace.system",
"aceId"=>"229CB9A2-6D00-4BB4-8B15-D5E5177F88F1",
"class"=>"SetRestrictions"}
IMPORTANT: Key this information available for the next step.
Step 7) - Now you have the authorization data, you need to put it into the auhtorization proxy (SiriAuth) navigate to SiriStuff/SiriAuth and open up siriAuth.rb in your favorite text editor. The top of the file should look like this:
#!/usr/bin/env ruby
require 'rubygems'
require 'eventmachine'
require 'zlib'
require 'cfpropertylist'
require 'pp'
require 'tweakSiri'
require 'interpretSiri'XAceHostKey = "ace"
ValidationDataKey = "validationdata"
AssistantIDKey = "assistantid"
SpeechIDKey = "speechid"
You need to put the information from the acehosts0.txt file into here like:
#!/usr/bin/env ruby
require 'rubygems'
require 'eventmachine'
require 'zlib'
require 'cfpropertylist'
require 'pp'
require 'tweakSiri'
require 'interpretSiri'XAceHostKey = "211ea22f-2740-4582-9f4d-4f7d9bd7cf28"
ValidationDataKey = "\002E!\216\371$\305X^\246\251\210\31752]\213\337\262\036\257\342\365\230\237kY\024\321\031\030X0\000\000\000\340\003\000\000\000I\000\000\000\200\233\323N8\242\bv\335\310\230R8\246\327\206\234\230\205)\213\e\270Z\300\206(\337?\242\2247\211?\345l8ZSF-\322\030\n\211uF\0322\254\275\363\363\202\233X\360\277\254\242\031\345\372\3169\200\263j\b\037*2{\n/\a\264\034\"\332\022\200\301\243w\021az\276\213c\b\252!\200\212\341\220tK\321y\240\a\270\276h\375\336\233\360In\003\337\315i\213\372sG,w\206\324y\325\241a\000\000\000\000\000\000\000O\001\0030\370\241\004\207z\214\355\2155M\312\374\273\200\035\a'T\000\000\0006\004\001\2012\325\260\327\226T\261K\266F\360\365\302\326\376N\347\222\255i\020\226\2106\207\267\274×5\315N\216\016\232\331\273[OVwZ\212)\3272+\220\343id\360"
AssistantIDKey = "04a9de4e-e92a-41b6-ab34-ab124186c258"
SpeechIDKey = "cc4301ac-db83-48bb-8380-378393b033b4"
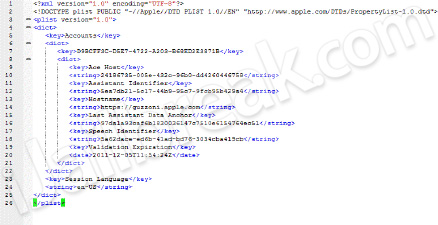
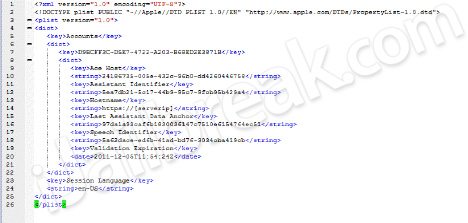
Step 8 ) - You now need to configure your device you wish to run Siri on to connect to the authorizationserver. To do this, SSH into your device (or use iFile), and open up this file:
/Users/Library/Preferences/com.apple.assistant.plist
It will look something like this:
You need to make it look like this:
You will need to change [serverip] to your server's IP address/ domain name, then save the file. Now, do the same steps when you copied the 'ca.crt' file an emailed it to yourself, except get the 'ca.crt' file from the SiriAuth directory and install it to the device that you want Siri on, not the iPhone 4S.
Step 9) - You are now ready to start your Siri Authorization Server. To run your newly created Siri Auth Server type in the following commands:
cd SiriAuth
rvmsudo ruby ./start.rb
Now run Siri on the device you wanted it on in the first place, and watch shit-loads of lines written in the terminal but Siri listening and functioning perfectly!
Moans and groans: It is highly recommended you DON'T make these servers public, if they go too public, Apple block requests from the IP address of the server (trust me, i know from personal experience). Twisted people could also use these servers to take mobile numbers, location data and personal information, which is why they shouldn't be public also.
Only use this server between a small group of friends or family (max), otherwise Apple will block your IP and you won't be able to use it again. This method (SiriAuth) works over 3G, you can run a DNS Siri auth server using dnsmasq but it doesn't work over 3G Yes, the validation keys expire after 24 hours, although @winocmis working on a way around this.
Post from my iPad 2


0 comments:
Post a Comment